Thank you so much for taking the time to visit my blog! Please look around and see what my blog has to offer, from party inspiration, DIY craft tutorials, yummy treat ideas, and so much more! And make sure to pin on Pinterest! If you click on the Free Printables tab on the top of this page, you will find all of my posts with free printables. Also, if you would like to stay up-to-date with all of my new posts, subscribe by email (enter it on the right margin of this page) or like my Facebook page HERE. Have a blessed day!

Monday, August 27, 2012

Making Crayons


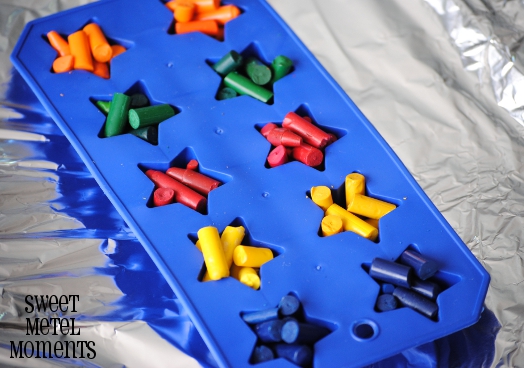
Since my kids have collected a large amount of crayons in the past few years (many that have broken), I have been wanting to make newly shaped crayons with them for a while now.  We finally did it during summer break!  I purchased a star-shaped silicone ice cube tray on clearance after 4th of July and I knew it would be perfect for this project.

Want to make your own crayons?  

Here is what you need:

Old Crayons
Silicone Mold Tray (you can get some at Dollar Tree or Ikea)
Cookie Sheet with Aluminum Foil
Oven

Here are the steps:

Step 1:
You can skip this step if you want to make the crayons multi-colored, but we wanted single-colored crayons, so we separated the crayons into different bowls by color.


Step 2:
This was probably the most time-consuming part.  You need to take off all of the paper that is on the crayons.  Some are stickier than others!


Step 3:
 Break the crayons into small pieces and fill up the mold.  Put the mold on a cookie sheet lined with aluminum foil (in case of any drips!) then place the mold and cookie sheet in a preheated 250 degree (F) oven for 5-10 minutes.  You can peek from time to time to make sure nothing strange is happening in there!


Step 4:
As you are peeking, use a toothpick to gently poke at the crayons to release some of the air pockets.  Once the crayons are completely melted, pull the cookie sheet and mold out of the oven and allow them to rest on the counter until cooled.  (I waited about an hour to be safe).


Step 5:
Sorry I didn't take a picture of this step -- Dip the bottom of the mold in a hot water bath, to help soften up the silicone tray and help separate the crayons from the bottom of the mold.  Then push the mold from the bottom and pop out each crayon.

And now you should have newly shaped crayons!!  
Have fun!


Tip: Although I will only be using this mold for non-food items, I still needed to clean it.  It was pretty waxy and messy, so I used Goo Gone Spray to help with the cleanup!  It was a great timesaver. 

Wednesday, August 22, 2012

Sweet Metel Moments Featured on Hostess With the Mostess


What?!  

I must be dreaming.  

Is that a picture of me and Chris on the pages of Hostess Blog?!  As most of you know, Hostess {with the Mostess} is the reason why I started blogging.  It is my favorite party blog and one that played a huge part in planting the seed and inspiring me to create Sweet Metel Moments.  It has been my #1 goal to get a party feature there.

And it actually happened!! 

YES!!   
I can't believe it!

Thank you so much to Jenn and the HWTM team for selecting my Love Shack Luau Party to feature on their amazing site!  Words cannot express how thrilled I am.  I have turned to that website for so much inspiration and it is surreal to see one of my parties being featured there.

I have been wanting to share this very special party with my wonderful Sweet Metel Moments readers!  Please check out the Love Shack Luau Party feature HERE!


Monday, August 20, 2012

Brody's First Day of 1st Grade


Wow, the summer flew by! 

I can't believe that Brody is in 1st grade.  We had a great morning for the first day of school and we are thrilled that his best friend is in the same class again this year!  Plus we saw some other familiar faces and Brody's teachers seem like sweethearts!


Skylar asked me why she wasn't going to school yet and I told her that next year she will be in preschool.  She is very excited for school, but in the meantime, she will show support to her big brother.


Look at my big boy in his first grade classroom!


Time sure flies.  Check out Brody's first day of kindergarten from last year!  Green is still his favorite color as you can see from his first day of school outfit selection.


Hope you have a great school year!  Here are some fun free printables that are great for the school year.  Just click on the photo to get to the source.  

Enjoy!


Monday, August 13, 2012

Spa Party - New Printable Collection


I recently designed a printable party collection for one of my sweet friends Kim, of Kim Colletto Photography.  She wanted to throw a spa birthday party for her daughter, Anna, who was turning 9.  I was so happy to work on this with Kim because I had been wanting to create a spa party collection for a while now, and when she showed me her Pinterest board of inspiration and other ideas she had, we were totally on the same page!

Thank you so much to Kim for letting me be a part of Anna's special celebration.  Not only did she create a beautiful party for her daughter, but she was able to capture the moments beautifully with her photos.  

Check out the pictures from this adorable party!


You can get the whole Spa Party printable collection in my Etsy Shop!


Sources:

Photography and Party Styling: Kim Colletto Photography
Party Printables: Sweet Metel Moments