Thank you so much for taking the time to visit my blog! Please look around and see what my blog has to offer, from party inspiration, DIY craft tutorials, yummy treat ideas, and so much more! And make sure to pin on Pinterest! If you click on the Free Printables tab on the top of this page, you will find all of my posts with free printables. Also, if you would like to stay up-to-date with all of my new posts, subscribe by email (enter it on the right margin of this page) or like my Facebook page HERE. Have a blessed day!

Wednesday, March 21, 2012

Tutorial - Easter Egg Branches Display


Happy Spring!  

I am slowly starting to decorate for spring and wanted to share with you the tutorial on how I made this Easter display using branches and Easter egg ornaments.

You will need:

Tree Branches
White Spray Paint
White Vase
Easter Egg Ornaments (can be found in Michaels, Dollar Tree, or other craft stores)

Step 1:
When you (or in my case, my sweet hubby) is trimming the trees, save a few branches for this project and set aside!  Here's my stash:


Step 2:
Pick a few of the best branches and remove the leaves.  You might want to have your vase near you to make sure the branches you pick will fit inside the vase.  Another tip is to pick branches that have more twigs coming off of it so you can hang ornaments from them.  Here are my favorites before I took all of the leaves off:
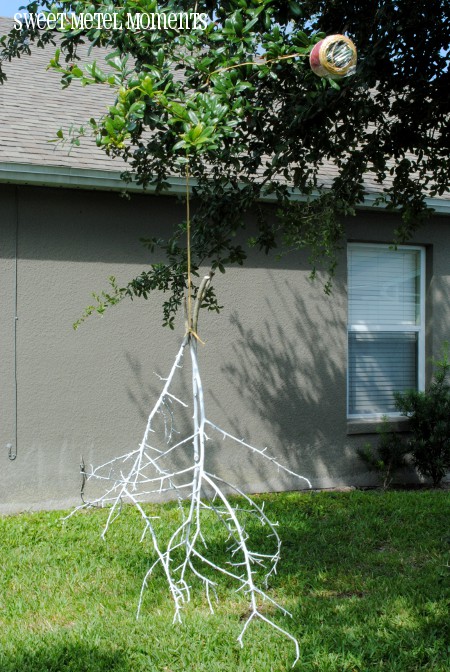

Step 3:
Once you've removed the leaves off of the branches, take all of them and tie them up so you can easily spray paint the branches.  I used our tree in the backyard and made sure that there was nothing nearby that I would accidentally spraypaint!


Step 4:
Let the branches dry overnight (or whatever the spray can directions instruct).  Once the branches are dry, you can go ahead and put the branches in your vase.


Step 5:
I was lucky enough to buy these sequined Easter egg ornaments on clearance at Michaels after Easter last year, but I saw them again this year, and they have other variations at Dollar Tree too.  But I'm sure you can find them at other craft stores.  So take these beauties and hang them anywhere your heart desires (in my case, it was anywhere Brody and Skylar wanted.  Surprisingly I only had to move a few of them to different places.)


Here's a closeup of the eggs just for fun:


And now you have a cute Easter Egg Ornament Display!


Here's another closeup shot:


I hope to have more spring decor up in a few weeks, and will make sure to share with you soon!

Linking Up:


Monday, March 19, 2012

Little Edu


I am so excited to introduce to you my sweet little nephew Ismael Eduardo.  He was born earlier today and I am trying to get this post in before midnight so I can have it up on his actual birthday!

It's amazing what God can create.  I see miracles all of the time, but nothing amazes me more than the birth of a brand new baby.  Can't wait to see what the Lord has in store for little Edu and we know that he will be doing great things.

Congratulations to my big brother Ish and sister-in-law Beatriz for the birth of their beautiful son!

Friday, March 16, 2012

Brody and Skylar's Knight and Princess Party Details

Today is another exciting day for Sweet Metel Moments!  One of my parties is on Hostess {With the Mostess}, aka Hostess Blog, aka HWTM, aka the reason why I started blogging!!  Brody and Skylar's Knight and Princess party is featured as part of their Party of 5!  Woohoo!  Here are the details of this very special party.
 
When I asked Brody what kind of theme he wanted for his 6th birthday, he immediately said UCF (University of Central Florida), which made me so proud as a UCF fan!  Since we were planning a joint party for Brody
and little sister Skylar, who is currently in love with all things princess, and since UCF’s mascot is a knight, I knew it would be perfect to throw a Knight and Princess party, black and gold style (our school colors).

Here is a peek at what the invitation looked like (I changed our personal information):


To stay on a budget, I created a lot of DIY pieces for this party.  I started by designing the custom party printables in black and gold and wanted to base everything else off of those colors.  One of my favorite pieces is a gold frame with black and white fabric that I used to display some pictures of the kids dressed up as a knight and princess (tutorial shown HERE).

 
For food we kept it simple and served pizzas along with sausage dip and buffalo chicken dip and various crackers and chips to dip with, along with apples and caramel.  I created customized bag topper labels and filled the sandwich bags with Skylar’s favorite snack, vegetable chips!  I also designed custom water bottle labels and even customized the labels on the 2-liter bottles of soda.  Everything had Brody and Skylar’s names on them since I wanted them to know that this party was just for them and that they were the stars!  


The dessert table was the best part!  For the backdrop, my husband used a tutorial from Celebrations at Home, but changed the top part by inserting curtain hooks so I could hang a curtain rod.  I used a white ruffled curtain as a simple and elegant backdrop.  


In the center was the beautiful cake created by my very talented friend Johanna of Pink Lady Cakes.  She was able to design a cake that was perfect for both my son and daughter, using a shield to represent the knights, and a beautiful crown for the princesses.  Not only did this cake look amazing, it was absolutely delicious!  


Other desserts included Oreo Cakesters that I dressed up by adding gold sparkly sugar, Oreos covered in white fudge, white chocolate castle pops that I made using candy melts and a lollipop castle mold, and lots of gold chocolates including Hershey Kisses with almonds, Rolos, and Hershey Bliss chocolates.  I also used embellished mini white popcorn boxes and filled them with caramel popcorn and chocolate covered pretzels.  I bought plain white vanilla cupcakes from Walmart and decorated them with my customized cupcake toppers.


I also wanted to create a special corner for the kids and made tables “Reserved for Knights” and “Reserved for Princesses”.   I created a simple girly tablecloth for the princess table (Tutorial HERE) and for the table’s centerpiece, I filled a rectangular vase with gold candy (Rolos) and stuck gold glittery star wands in the center.  The girls would later take the wands home along with tiaras and floral hairclips that were also laid out on their princess table.  


For the knights, they had shields and swords as décor, but they also used them for entertainment during the party, and took them home as favors.  


For the main seating table, I used black and white damask plates that I found at Hobby Lobby and shields to set the table.  I also used a large black and gold candleholder in the center and topped it with one of husband’s knight figurines.   We had our UCF mascot, Knightro, present on the table in the form of bobbling Knightro head figurines.  Inspired by a beautiful Amy Atlas Princess Party, I created gold wand centerpieces using mini white popcorn boxes embellished with delicate gold ribbon and a customized tag and filled with Hershey kisses. 


 For the party we rented a huge Knight/Princess bounce combo unit that had the kids bouncing, sliding, and playing basketball.  The kids stayed there almost the entire time, it was a huge hit! 


Some of the kids also enjoyed coloring some adorable princess and knight coloring pages that I printed from the Family Fun website and they also had a fill-in fairy tale where the kids filled in blanks using their own words and the final story was their very own creation.  We had such a wonderful time sharing this special celebration with Brody and Skylar.   It was a day that we will remember for a long time!

Thank you to our wonderful family and friends who shared this special day with us!  We love you guys!  And of course my amazing husband who is my wonderful partner in everything I do.  You're the best!


Vendor Credits:
Styling and Customized Party Printables: Sweet Metel Moments 
Photography:  Chris and Iris Metel, Family Photo by Chris Zaremby
Gold Star Wands & Mini-Popcorn Boxes – Oriental Trading 
Swords & Shields – Dollar Tree 
Black & White Damask Plates and Black & Gold Candleholder – Hobby Lobby 
Ballerina Wire Dress Form – Ross 
Knight Statue – Tin Knights 
Tutus, Crowns, & Hair Clips – Halo Heaven 
Skylar’s Crown Shirt & Purple Princess Dress – Target 
White Ruffle Curtain – Target 
White Frames and Kids’ Tables – Ikea 
Various Apothecary Jars and White Cake Stand – HomeGoods 
Mini White Paper Fans (above princess table) – Party City
Knight & Princess Bounce House – Coast2Coast PartyRentals 

You can check this party out on Hostess Blog HERE!

Friday, March 9, 2012

Brody and Skylar's Party Featured on Amy Atlas


Somebody pinch me.  I must be dreaming.  But one of my parties is on Sweet Designs, a blog by Amy Atlas.  What?!  THE Amy Atlas, the one who I've seen on the Today Show giving tips on styling dessert tables.  THE Amy Atlas who has styled parties for Brooke Shields, worked on events with Kelly Ripa and Anderson Cooper, has had work appeared in countless magazines like O Magazine, People Magazine, InStyle MagazineParents Magazine, just to name a few!

Amy Atlas is known as the queen of dessert tables, and to me, she is truly an inspiration.  I turn to her blog for visual eye candy and I still can't believe that today I see Brody and Skylar's party as a part of it!

I am so grateful to Amy Atlas and her amazing Sweet Designs team!  Thank you so much for featuring this Knights and Princess party made for my sweet Brody and Skylar.  I will be posting more details on this party very soon, but in the meantime, please make sure to see the feature HERE.


Monday, March 5, 2012

Brody's Preschool Graduation Party & Free Printable


I can't believe that Brody's kindergarten year is coming close to its end and I still haven't had a chance to share his preschool graduation party from last year!  This party theme is near and dear to my heart because I absolutely loved Brody's preschool and was sad to know that he was leaving it, plus knowing that he would eventually be going to school 5 days a week!  I was very emotional, but I know that Brody is a big boy now and ready to blossom and learn more and more things!

Aside from the educational curriculum, Brody's preschool taught him so many wonderful things about Jesus.  So I created a graduation party theme "Shine!", inspired by the Bible verse Matthew 5:16 "Let your light shine before men in such a way that they may see your good works, and glorify your Father who is in heaven."  The main image for the party printables is a smiling and shining sun.  And the color scheme of blue and gold matched their cap and gown.

All of the parents pitched in and brought yummy snacks and drinks.  My friend Laura, (who taught me how to sew!) turned chocolate snack cakes into cute little diplomas!  I decorated plain vanilla and chocolate cupcakes from Walmart with customized cupcake toppers.  I also wrapped mini Hershey candies with customized labels.  There were other sweet treats like brownies and cookies, and salty snacks like chips and pretzels.

For favors, the kids got bags with a personalized tags saying, "You are so bright, go out and shine your light." and inside was a flashlight and some sweet treats.  Our little "Dolphins" (their class name/mascot for the year) had a lot of fun.  Here are some more pictures from their special party:


Update:  This photo has been featured on Shutterfly (my absolute favorite place to create photo gifts and photo creations!!) Check it out HERE!


Since I love this theme so much, I wanted to share with my readers the 4x6 signs pictured above, but instead of it saying "Congrats Dolphins", it just says "Congrats Grad".  Get your free printable HERE.


The whole Graduation Party printable collection is now in my Etsy Shop!  You can purchase it HERE.


I know it's been almost a year ago, but I have to show a photo of our sweet Brody in his cap and gown.  We are so proud of him!


Linking Up: